


Water Bottle Holder Project
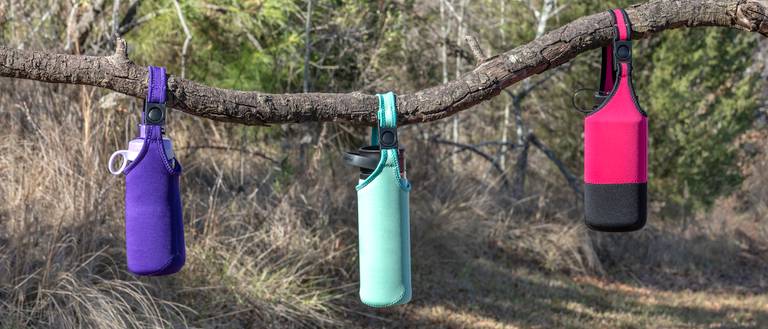
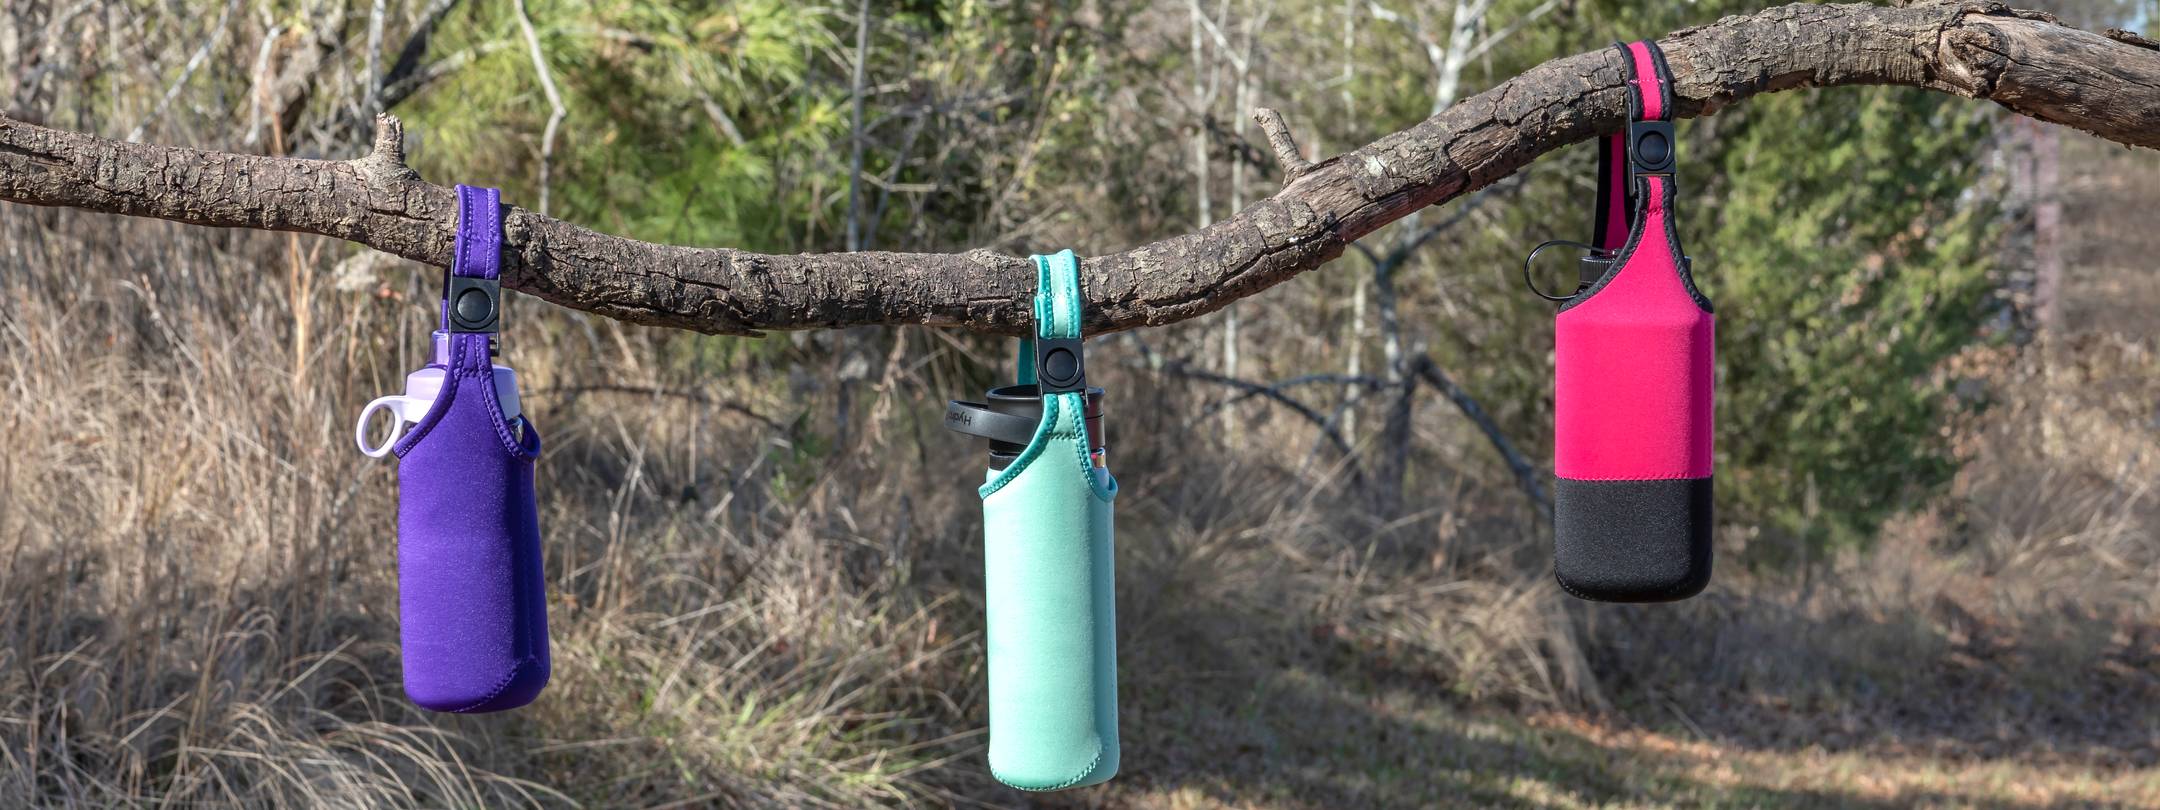
Water bottles are a necessity when engaging in sports—walking, biking, running and other assorted high-energy endeavors. But they can be cumbersome and difficult to carry with you. Unless you have a bottle bag. This simple container can be made to fit any size bottle and the center release buckle means you can access it at a moment’s notice. Hook it onto another bag or device and remove easily. While the Neoprene is not technically insulating, it does help keep the bottle at its original temperature. Besides, with fun colors it can become a fashion statement!
Supply List
- 5/8 YD Neoprene Fabric for bag
- 1/8 YD Polyester Jersey Knit for binding
- Dritz Mark-B-Gone® Marking Pen
- Dritz Ball Point Pins or Dritz Extra-Fine Glass Head Pins
- Dritz 1” Center Release Buckle
- Omnigrid 45mm Rotary Cutter with a fresh blade
- Omnigrid 24” x 36” Cutting Mat
- Omnigrid 3-1/2” x 24” Ruler
- Omnigrid 8-1/2” Fabric Scissors
- Sewing Machine (open arm recommended) and Matching Thread
- Schmetz 70/11 or 80/12 Knit or Non-stick Machine Needles
- Dritz 12” Curve Ruler (Optional)
- Water Bottle Bag Pattern & Printing Guide

Optional Crossbody Strap
Additional Supply List
- 48” of 1” wide Dritz Belting/Strapping
- Dritz 1” Center Release Buckle
- Fray Check®
Sewing Technique
All seam edges are butt together. There is no seam allowance. To butt edges together, place the two edges to be joined so edges are centered under presser foot. Set machine to a zigzag stitch, width 4-6 and length about 3. Zigzag to join pieces, pushing the two edges together as you stitch. Edges must touch; if not, stop with the needle in the fabric, in the down position. Raise foot, adjust fabric, lower foot again, and resume stitching. Test-stitch this method on scraps of fabric until you are assured of a nicely stitched seam. Note: Always back-stitch at the start and finish of each seam.
Choosing Pattern Size
Bottles are available in many sizes. Diameter and height vary, even within bottles with the same fluid measurement. The pattern is designed for use with stretch knits to allow a variety of bottle widths to fit. However, you may wish to adjust the width or length as shown below.
Diameter: Measure the base diameter of your bottle. Our pattern comes in two sizes. Small–medium (Diameter 2.75”–3.25”), and Medium–large (Diameter 3.25”–3.5”).
Height: Measure your bottle height from the table to top curve or top edge of bottle (not necessarily the lid). An approximate measurement is fine. Both pattern sizes fit a bottle ranging from 8”–9.5” high. Your bottle might sit higher or lower within the bag because of stretched Neoprene. Note: Pattern side seams start 1-1/4” above bottom of bottle, so add 1-1/4” to pattern side measurement when comparing height. Any handle should go above top edge of bag. To lengthen or shorten the bag, see step 2.

Making Pattern Adjustments
Cut out the printed pattern. Tape the extension sections together for front and back. Use a small sharp scissors or pattern notcher to clip out each notch. You can also use a rectangular hole punch, punching only the edge of pattern.
Adjusting Height: The front and back bag have a Lengthen/Shorten line. To lengthen, cut pattern on this line. Tape a piece of paper under cut pattern. Extend the center pattern line and then mark desired increase in length with a line parallel to Lengthen/Shorten line. Move pattern pieces apart evenly, making sure the center lines match and tape. Repeat for second piece. The increase should be equal side to side and the same for front and back; otherwise, fabric edges will not match when stitched. To shorten, draw a line parallel to Lengthen/Shorten line in desired amount. Crease pattern on marked line; bring creased edge up to Lengthen/Shorten line. Tape. Make sure front and back match at each side. NOTE: The strap also has a Lengthen/Shorten line; use this if you require a shorter or longer strap.


Adjusting Width: Because Neoprene stretches, width changes should not be necessary. However, if you choose to increase or decrease width, cut or fold along vertical center line on each piece; follow step 2 to adjust pattern. Blend top and bottom edges curve is smooth. Increase or decrease the base pattern in the same amount to ensure matching edges.

Cutting and Marking Instructions:
1: Pin pattern pieces to Neoprene, lining up straight-grain arrow so it is parallel to selvage edge. Cut along edges of each pattern piece, keeping cut edge as smooth as possible. TIP: Neoprene “creeps” or moves slightly when pinned. To prevent buckling the pattern, first point tip of pin straight down into pattern and Neoprene. Then angle pin to attach paper to fabric. If paper buckles, remove pin, and repeat the process.
 2: For binding, use rotary cutter, mat and ruler to cut a 1-1/8” wide strip across width of the jersey fabric. You will need about 35” of binding for small-medium and about 40” of binding for medium-large. Cut it a bit longer, trimming excess when complete.

3: Pattern edges have many notches to use as guides to help prevent accidental stretching. Mark each notch with the Mark-B-Gone® marker. The pattern is printed wrong side up so if marks extend beyond stitching, they will not show. However, if marks are absorbed into the spongy layers, water will remove them when stitching is complete. Just dip the entire bag into water, rubbing any visible marks as you do so. Allow to dry completely.

Assembly Instructions
All bag seams are joined by abutting cut edges and stitching with a zigzag stitch set at width 4-6, length 3. Simply hold edges together just in front of the presser foot. Stitch slowly, pushing edges together as you stitch.
1: Join base to bottom edge of back bag. Align bottom bag corner and first notch of each piece. No pinning is required; push sides together and align marked notches as you stitch. Remove bag from machine.

2: To join front and back along seam A, align top edges; then holding edges firmly together, take a few stitches to secure. Backstitch and continue to zigzag toward attached base, aligning notches. Do not remove bag from sewing machine.

3: Continue stitching, connecting front bottom edge of bag to front edge of base, aligning notches. Do not remove bag from machine. TIP: if pieces become slightly misaligned, gently pull one side to match the other as you stitch.

4: Continue stitching from base to side seam B, carefully matching notches. At this point bag will start to bunch up behind presser foot. This is normal. Pull Neoprene edges together carefully, matching notches. If Neoprene pulls apart, stop with needle in down position in the Neoprene, raise foot and realign Neoprene. Lower foot and continue to stitch slowly. Continue to stitch to top edge of bag. Backstitch and remove bag from sewing machine.

5.Turn bag right side out.

6: Leaving a 3/8” tail, pin binding to right side top edge of bag, starting at square end of short strap. Use same pinning technique as in step 4. Align long cut edges, placing a pin every ¾”–1”. Pull binding slightly when pinning it to curves, but do not pull along straight edges. Cut excess binding about ½” beyond end of long strap section. Straight stitch binding to bag using a ¼” seam allowance; pull pins as you stitch.

7: Fold binding tightly over edge of bag and pin every ¾”. Inside edge of binding should be about ½” from fold.

8: Set zigzag stitch to width and length at 3. Working from the right side, zigzag over fold of binding so stitch catches binding on wrong side. Remove pins as you stitch. Remove from machine when complete.

9: Starting at top edge of long strap, repeat steps 12–14 to bind remaining top edge of bag.

10: Trim binding ends so they extend about ¼” from ends of straps. Turn bag wrong side out. Carefully trim binding edges if they extend too far from stitching. Turn bag right side out.
11: Unlatch center release buckle. Insert short strap through inside slot of buckle section with button, right to wrong side, so button faces outward. Fold binding extensions under and pin.

12: Insert long strap through inside slot of remaining buckle section right to wrong side. Fold binding extensions under and pin. Make sure strap is not twisted with center release button facing out.

13: Zigzag across strap ends to secure. Make sure binding ends are caught in stitching and are not visible.

14: Your completed water bottle holder!

Bag Hacks

Be creative! Join any two colors anywhere on the bag by simply cutting and zigzagging Neoprene pieces together before cutting out the bag.

If you are creating horizontal color blocking and want the seams aligned be sure to mark your seam placement on patterns before cutting. Backstitch at these marks as well to keep two-color seam from raveling when cut.
Optional Long Bag Strap
1: Cut a piece of strapping to desired finished length plus 2”. Test this length pinned to the buckle and your bottle bag. Keep in mind that the bottle will hang lower than anticipated because of bottle weight and stretchable Neoprene.
2: Seal the cut ends of the strapping with Fray Check®. Allow to dry.

3: Fold the cut ends of the strapping through inner slot at each side of a center release buckle right to wrong side. Pin. Make sure strapping is not twisted and button of buckle faces to right side.

4: Stitch across ends of strapping through both layers.

5: To use the long strap, open buckle on water bottle bag. Insert opposing end of strap buckle into its corresponding end on bottle bag buckle. Voila. You have an extended cross-body bottle bag.
