


Modern Flying Geese Block Project

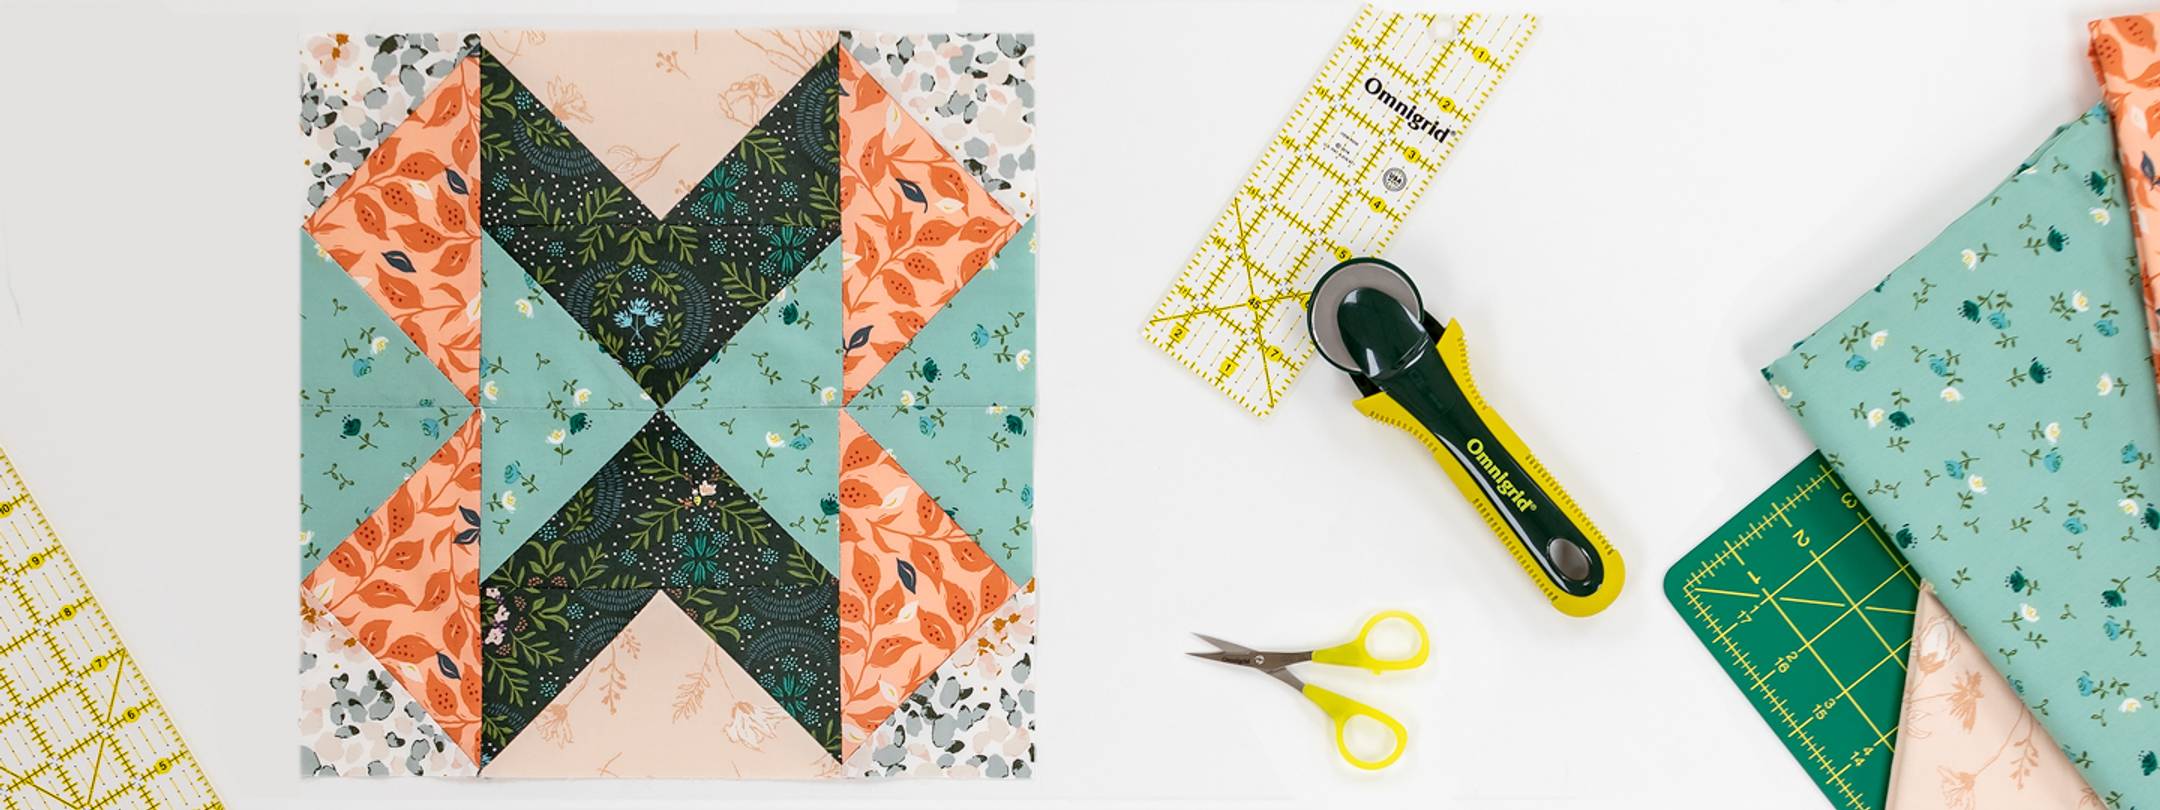
Flying geese is a classic quilt block element that has been around for years. Typically, the length of a flying goose block is twice as long as it is tall. The large triangle in the middle is referred to as the goose body, while the two smaller triangles on the outside are the sky. Our block is sewn with Art Gallery Fabrics from the Velvet collection by Amy Sinibaldi. The finished block size is 12-1/2” x 12-1/2”.

Supply List

- Five (5) Fabrics, 1/8 YD each
- Quality 100% Cotton Thread, 50 or 60 weight in a neutral color
- Dritz Fine Lead Mechanical Pencil (Tailor’s Marking Set includes multiple color ceramic leads
- Dritz Quilting Pins
- Dritz Seam Ripper
- Omnigrid 4” Needlecraft Scissors
- Omnigrid 45mm Rotary Cutter with a Fresh Blade
- Omnigrid 2-1/2” x 8” Ruler
- Omnigrid 6” x 24” Ruler
- Omnigrid 18” x 24” or Larger Cutting Mat
- Iron and Pressing Surface
- *Sewing Machine
- *Sewing Machine Needles (size 80/12 Universal)
Cutting Instructions:
All cutting is done with a rotary cutter, mat and ruler. Using the 6” x 24” ruler, cut a strip from each of the five fabrics, 3-1/2” x WOF (width of fabric). Then sub-cut the following pieces:
- From the BLACK, cut two (2) rectangles, 3-1/2” x 6-1/2” and four (4) squares, 3.5” x 3.5”
- From the SEAFOAM GREEN, cut eight (8) squares, 3-1/2” x 3-1/2”
- From the CORAL, cut four (4) rectangles, 3-1/2” x 6-1/2”
- From the PEACH, cut two (2) rectangles, 3-1/2” x 6-1/2”
- From the WHITE, cut four (4) squares, 3-1/2” x 3-1/2”
Assembly Instructions:
All seams use a 1/4” seam allowance with a recommended stitch length of 2.5–3.
BACKSTITCHING: Those of you who sew garments are used to backstitching at the start and end of each seam. Most quilters do not backstitch as it adds additional thread, and can cause a small lump when pressed. Therefore, we do not call for backstitching. However, if you plan to handle the finished block a lot after completion, you may choose to do so; be sure to stitch carefully in line with the row of stitching.
PRESSING: Press as you go on your pressing surface. Though it will not be illustrated in individual steps, press each seam once flat, as it was stitched, to set the stitches. Then press again in the direction instructed.
Four units will be constructed: A, B, C, and D. You will create two of each unit. Units will then be connected to form a larger block. Before stitching, group your fabric pieces in the below combinations to more easily join the correct colors as you sew the block.
Unit A: PEACH rectangle (goose body) with BLACK squares (sky corners)
Unit B: BLACK rectangle with SEAFOAM GREEN squares
Unit C: CORAL rectangle with a WHITE square on the left and a SEAFOAM GREEN square on the right
Unit D: CORAL rectangle with a SEAFOAM GREEN square on the left and a WHITE square on the right
Unit A:
Step 1: Draw a diagonal line from corner to corner on the wrong side of each BLACK 3-1/2” square.

Step 2: Place a BLACK square on a PEACH rectangle, right sides together, with edges aligned, so the diagonal line travels from top left corner to bottom right corner. Pin.

Step 3: Stitch on the line. Turn the fabric so you can start at the center of the rectangle to avoid pulling the corner points into your machine’s feed dogs.

Step 4: Working on your pressing surface, press fabric flat as it was stitched to set the stitches.
Step 5: Place the ruler so it sits over the rectangle with the 1/4” grid-line aligned to the stitch line. The edge of the ruler will be 1/4” from the stitch line. Use the rotary cutter to cut along the edge of the ruler.

Step 6: Press the BLACK corner away from the PEACH rectangle.

Step 7: Repeat steps 1 – 3 on the opposite corner of the rectangle with another BLACK square. Place the square so the diagonal line travels from the top right corner to the bottom left corner. Pin.

Step 8: Repeat step 3 to stitch the second BLACK square and step 4 to press the seam.

Step 9: Repeat steps 5 – 6 to cut (9a) and press (9b) the second BLACK square.

Step 10: Repeat steps 1 – 9 to make a second Unit A. NOTE: The wide end of the PEACH triangle is the bottom and the point is the top of UNIT A.

Unit B:
Step 1: Draw a diagonal line from corner to corner on the wrong side of the SEAFOAM GREEN 3-1/2” squares.

Step 2: Place a GREEN square on a BLACK rectangle, right sides together, with edges aligned, so the diagonal line travels from the left top corner to the bottom right corner. Pin.

Step 3: Turn the fabric and stitch on the line, starting at the center of the rectangle.

Step 4: Press the fabric flat as in step 4, Unit A.
Step 5: Place the ruler so it sits over the rectangle with the 1/4” grid line aligned to the stitch line. The edge of the ruler will be 1/4” from the stitch line. Use the rotary cutter to cut along the edge of the ruler.

Step 6: Press the SEAFOAM GREEN corner away from the BLACK rectangle.

Step 7: Repeat steps 1 – 3 on the opposite corner of the rectangle with another SEAFOAM GREEN square. Place the square so the diagonal line travels from the top right corner to the bottom left corner. Pin.

Step 8: Repeat step 3 to stitch the second SEAFOAM GREEN square, and step 4 to press the seam.

Step 9: Repeat steps 5 – 6 to cut (9a) and press (9b) the second SEAFOAM GREEN square.

Step 10: Repeat steps 1 – 9 to make a second Unit B. NOTE: The wide end of the BLACK triangle is the bottom and the point is the top of UNIT B.

Unit C:
1.Draw a diagonal line from corner to corner on the wrong side of one SEAFOAM GREEN 3-1/2” square and one WHITE 3-1/2” square.

2. Place a SEAFOAM GREEN square on a CORAL rectangle, right sides together, with edges aligned, so the diagonal line travels from the top left corner to the bottom right corner. Pin.

3. Turn the fabric and stitch on the line, starting at the center of the rectangle.

4. Press the fabric flat as in step 4, Unit A.
5. Place the ruler so it sits over the rectangle with the 1/4” grid line aligned to the stitch line. The edge of the ruler will be 1/4” from the stitch line. Use the rotary cutter to cut along the edge of the ruler.

6. Press the SEAFOAM GREEN corner away from the CORAL rectangle.

7. Repeat steps 1 – 3 on the opposite corner of the CORAL rectangle with the WHITE square. Place the square so the diagonal line travels from the top right corner to the bottom left corner. Pin.

8. Repeat step 3 to stitch the WHITE square, and step 4 to press the seam.

9. Repeat steps 5 – 6 to cut (9a) and press (9b) the WHITE square.

10. Repeat steps 1 – 9 to make a second Unit C. NOTE: The wide end of the CORAL triangle is the bottom and the point is the top of UNIT C.

Unit D: This is the reverse of Unit C.
1.Draw a diagonal line from corner to corner on the wrong side of one WHITE 3-1/2” squares and one SEAFOAM GREEN 3-1/2” square.

2. Place a WHITE square on a CORAL rectangle, right sides together, with edges aligned, so the diagonal line travels from the top left corner to the bottom right corner. Pin.

3. Turn the fabric and stitch on the line, starting at the center of the rectangle.

4. Press the fabric flat as in step 4, Unit A.
5. Place the ruler so it sits over the rectangle with the 1/4” grid line aligned to the stitch line. The edge of the ruler will be 1/4” from the stitch line. Use the rotary cutter to cut along the edge of the ruler.

6. Press the WHITE corner away from the CORAL rectangle.

7. Repeat steps 1 – 3 on the opposite corner of the CORAL rectangle with the SEAFOAM GREEN square. Place the square so the diagonal line travels from the top right corner to the bottom left corner. Pin.

8. Repeat step 3 to stitch the SEAFOAM SQUARE and step 4 to press the seam.
9. Repeat steps 5 – 6 to cut (9a) and press (9b) the SEAFOAM GREEN square.
10. Repeat steps 1 – 9 to make a second Unit D. NOTE: The wide end of the CORAL triangle is the bottom and the point is the top of UNIT D.

Join Units A – D to build the larger block. All units are stitched right sides together, aligning outer edges. Note: the point of the large triangle is considered the TOP of the flying goose block, and the opposite edge (the wide part of the large triangle) is the BOTTOM of the flying goose block. Use pins to keep edges aligned and seam allowances in place as you stitch. Also, keep in mind that diagonal seams, already stitched must align. Use a 1/4” seam allowance as above. Press all seams as you go.
1.Stitch the top edge of one Unit A to the bottom edge of one Unit B to create a 6-1/2” square. Repeat for the second set of Units A and B.

2.Press the seam to set the stitches. Then press the seam open.

3.Stitch the bottom edge of one Unit D to the right-side edge of one Unit A/B.

4. Press the seam to set the stitches. Then press the seam open.


7. Repeat steps 1-6 to create the second 12-1/2 x 6-1/2” rectangle.
8. Place the two rectangles right sides together aligning the SEAFOAM GREEN triangles. Pin, making sure diagonal seams line up and black points match at the center. Place pins to hold the seam allowances in place so they don’t fold incorrectly when stitched. When the two rectangles are unfolded, the rectangles should be a mirror image of each other with WHITE triangles in each outer corner and SEAFOAM GREEN triangles meeting at the center.
9. Stitch the two rectangles together using a 1/4” seam.

10. Press the seam as it was stitched to set the stitches. Then press the seam open. Your quilt block is complete!


Now that you have completed this wonderful quilt block, what do you do with it? Well, create a tote with the block as the focal point. Frame it or work it into something larger like a table runner. The Modern Flying Geese block is just the beginning of your quilting expertise!